The following procedure applies to adding or
editing form types that are sequential, and do not have a tree-based hierarchy.
In the default TRACE setup, this includes Action Items, Bugs, Issues, and Test
Runs.
To add a new or edit an existing form:
|
Tutorials Available: Go to Standard Forms for a list of interactive tutorials on using forms. |
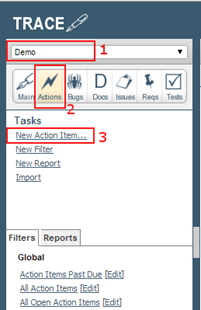
1. Select the project
from the drop-down list at the top of the Task
pane. See Figure 5‑1
2. Select the Module
button from the Module bar. For
sequential forms, this will be Actions,
Bugs, or Issues.
3. Perform one of the
following:
a. Create a new form: Click New <Form Type>… in the Task pane. For example, click New Action Item… to open the new form
dialog to create a new Action Item form. Go to step 4.
b. Edit an existing form: Navigate to display
the form information in the Main
pane. Click Edit… in the Action
links to display the Edit Form
dialog.
Figure 5‑1: Create sequential
form
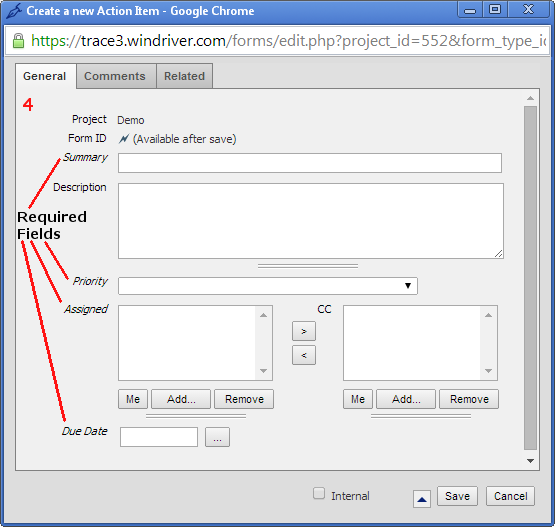
4. Enter/edit the
necessary information in the form’s General
tab. See Typical Form Elements and Fields for additional
form-related information. See Figure 5‑2
|
Note: Field names in italics represent required fields. Users must complete these fields to successfully save the form information. |
Figure 5‑2: Create or Edit Form
- General Tab
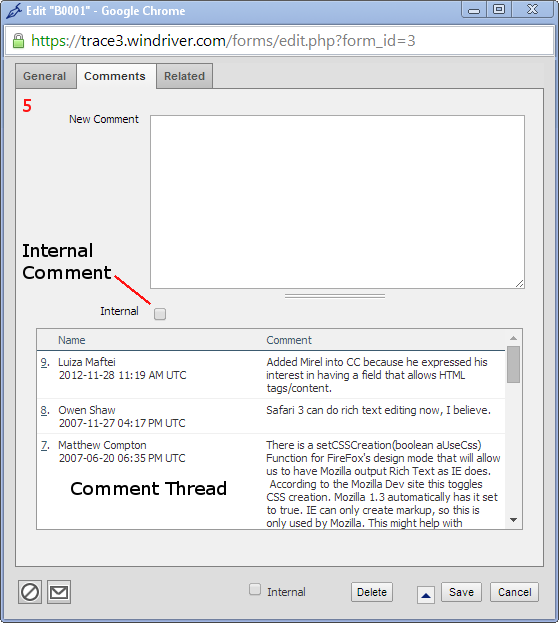
5. To add or update a
comment, select the Comments tab.
See Figure 5‑3
a. Enter a new comment
in the New Comment field.
b. Optionally, select
the Internal checkbox. See Internal vs. External for additional
information.
Figure 5‑3: Create or Edit Form
- Comments Tab
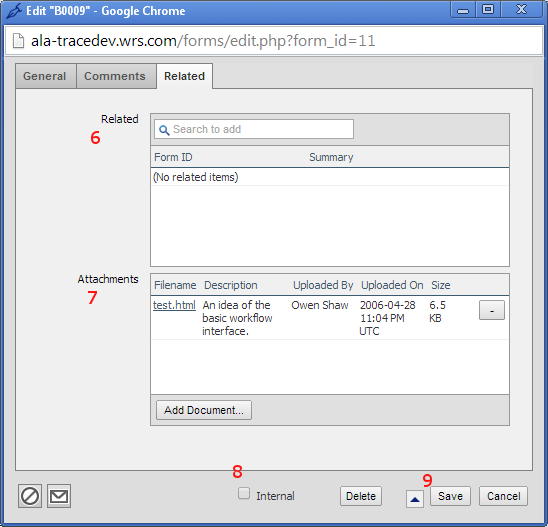
6. To add or update
related items, such as related forms or documents, select the Related tab as shown by Figure 5‑4. The Related field lists all previously
related (linked) items. For a new form, this will be blank. To manage related
items:
a. Add new related: Enter criteria in
the search field and press Return. Select the checkbox next to the item (to add
it) and click Add.
b. Delete related: Click the – (minus) button to the left of the
item.
7. The Attachments field lists all
previously attached documents or URLs. For a new form, this will be blank. To
manage attachments:
a. Add new attachment: Click Add Document to display the Add a Document dialog.
1) Select whether the
attachment is a file (Upload) or a link to a file (URL). For a file, navigate
to the document location. For a link, enter the web address, for example,
http://doc.com/trace-attach.html.
2) Enter a description
and click Add.
b. Delete attachment: Click the – (minus) button to the left of the
item.
8. Optionally, select
the Internal checkbox of the form. See
Internal vs. External for additional
information.
9. Once all form
information is entered successfully, click Save.
Optionally, choose a save option from the arrow icon next to the Save button. Save options include:
a. Save as Copy: Select to use an
existing form as a template and save it using a different name.
b. Save & Keep Editing: Select to save the
form’s work-in-progress.
Figure 5‑4: Create or Edit form
- Related Tab