Form Types are the templates
for the forms and a form is an instance of a form type. Prior to beginning,
have the following information available:
● Whether the new form
type will belong to an existing module or a new one.
● The form type name,
description, and any required fields. TRACE uses the form and field names to
find, sort, and report on.
● The workflow and
relationship to other form types.
To modify an existing or create a new form type:
|
|
Tutorials Available: Go to Creating or Changing a Form Type for an interactive tutorial on adding new form types to a project. |
1. Log into the project
as a Project Admin.
2. From the project home
page, click Form Types from the Action links.
● To add a new form
type, click New Form Type… at the
top of the Main pane.
● To modify an existing
form type, click the link for the form type that requires modification.
The Create a new Form
Type or Edit Form Type dialog
displays.
3. Enter new or edit
existing information in form type settings displayed in tabs in the right side
of the window:
a) General tab
● Name: Enter a name for
the form type.
● ID Prefix: Enter an ID prefix.
TRACE automatically places the ID prefix prior to the ID number assigned to the
form once a user enters information and saves the form.
For example, a bug with an ID prefix displays in TRACE as
B0023. The same bug without an ID
prefix displays as 0023. Optionally,
select Can Hide to make the
"hide prefix" option in the global project options available for this
form type.
● Module: To add the form
type to an existing module, select the module from this drop-down list. The
module drop-down list displays as default the list of module already added to
project.
Click Load Other
Modules… option, the last in the list, to load all the modules in the
system and select the appropriate one.
If any of the existing modules does not match the project
needs, create a new module to add the form type to, by clicking New module icon to open the Create a new Module dialog. See Modify or Create Modules.
● Description: Enter a brief
description for the form type.
● Numbering: Choose the
numbering scheme for the form type or create a new one.
o
TRACE Default: ID prefix followed
by 4-digits, with zeroes filling blank spaces.
For example: B0001
or B0023. Similar to issue or bug
numbering.
o
TRACE Group Default: Sequential
numbering with child forms inheriting parent numbering. For example, if a group
number is 1.1, the first child
displays as 1.1.1, the second 1.1.2, and so on. Similar to test
group, test case, and test step numbering.
o
Change on reorder: Select this to have
form type numbering change when users drag a form to a new location within the
tree.
● Workflow: Choose the workflow
that best suits the form type's needs. Workflow defines the path from
identification to resolution. Choose one of the following:
o
Action Item Default: Open > Close
o
Bug Default: Open > Resolve
> Close
o
Issue Default: Open > Resolve
> Close
o
Requirement Default: Propose >
Approve > Delete
o
Test Run Default: Open > Verify
> Close
● Statuses Display as Drop-down List: Check this option
to change the default display on forms of the workflow. By default, the
statuses display as a group of radio choices. When this is checked, the
statuses display as a drop-down list, more ergonomic with GUI.
b) Type tab
● Forms of this type:
o
Track Results: Select to track
form results internally. Causes the form to work like test runs; it will save
the results.
o
Contain other forms: Select to make this
new form type a parent to existing form types, and to create a tree structure
in TRACE for the new form type.
For example, the Tests and Requirements modules both
contain 'child' forms within their tree structure. Once selected, a new Children tab displays in the middle
“form builder” section.
Checking Enable
Baseline option makes available the Baseline for trees. Refer to Baselines for details on how
to use it.
c)
Sync tab contains settings
can be bring from other forms, refer to Reuse of Form Types for details on Base and Customized Form Type
·
Bring new fields
from: The customized
form-type version will be updated with the new fields from base or other
customizations.
This option displays only for a Customized Form Type.
1) Choose the location
from where to bring new fields: from base form type or from a customization
from another project.
2) Clicking Apply button brings fields from
location that is not in the current form type.
3) The form type
displays its existing fields and the new fields as highlighted.
4) Review the new
fields: remove unwanted ones, keep the appropriate ones and change field
setting accordingly
5) Keep in mind that the
form and the changes are not saved yet. Click Save to save the changes, if this
is all you need or keep continue the customization.
·
Copy fields from: The customized
form-type version will be replaced with fields from base or other
customizations.
This option displays only for a Customized Form Type and works
as Bring new fields from above, the
main difference is that when fields are bring from source location, the
existing fields of form type are removed from display.
·
Revert to Base: The customized
form-type version reverts to base and save it.
This option displays only for a Customized Form Type. When
applying it, the form automatically saves your action.
·
Customize for project:
reloads page and starts a Customized Form Type
This option displays only for a Base Form Type.
·
Customize base: loads base form type
for changing.
This option displays only for a Base Form Type.
d)
Email tab:
·
Notification Email
Template: chosen template
establishes what information is displayed on the email notification. See Email Notification.
o
Complete: displays entire
information as is displayed on the form
o
Restricted: displays the form Summary, Form ID and the form link
o
Very Restricted: displays only the Form ID
4. Use the form builder
section of the dialog to build and/or edit the form type. By default, the General tab displays.
a) To change the tab
name, enter the new name in the Tab Name
field.
b) To add a new tab:
1) Click + icon
2) Enter the tab name in
the Tab Name field.
3) Left-click the tab
and drag it – left or right – to the desired location.
c) To remove a tab:
1) Click the tab name.
2) Click Remove Tab.
5. Click the tab to add
fields to or edit fields on.
6. Add fields to the
tab:
a) To add an existing
field, click the field name link in the lower section of the dialog in the Fields list. Once clicked, the field
displays in the selected tab in the middle “form builder” section of the
dialog.
Fields are displayed in 3 categories:
i. Standard containing all
global fields, that can be re-used in any project but cannot by changed by
Project Administrator. Only TRACE Admin can create and change global fields.
ii. Editable by You containing fields
created in the current project and in the projects where you have Project Administrator
rights.
iii. Other containing fields
created in other projects that you can reuse but not change.
|
|
Tip: Use the field search box to
find fields. Search by field name, by field type or by the project name that
created the field. Then use the Details link displayed for each field to
inspect and review the field settings. |
b) To add a new field,
click the ![]() icon in the lower section of the dialog. Refer
to Modify or Create Fields for information on
defining new fields.
icon in the lower section of the dialog. Refer
to Modify or Create Fields for information on
defining new fields.
c) To move a field’s
location, left-click the ![]() icon next to the field and drag it up or down
to a new location.
icon next to the field and drag it up or down
to a new location.
|
|
Tip: To change the name of an
existing field, it is not necessary to create a new field. Add the field to
the form type and then click More to update the field name. |
d) To make a field
required, select the Required
checkbox next to the field.
Figure 6‑4 Field Options
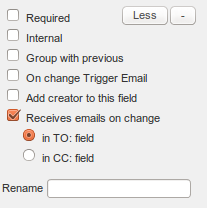
e) To set additional
field properties, click More to the
right of the field. Options include:
● Internal: Select to make this
field available to users marked as Internal.
·
Group with previous: Select to have the
field display side-by-side with the previous field.
·
On change Trigger
Email: Select to trigger
an email notification sent to notifiable users when field value is changed
·
Add creator to this
field: Displays only for user
fields. Select to add automatically the form creator to the field when creating
a form of this type.
·
Receives emails on
change (in To or in CC
field of the email). Displays only for user fields. Select to include the users
from this field into notifiable user list (email distribution list) for
receiving email notifications when this form is changed.
·
Rename: Enter a new field
name.
|
|
Tip: Click Less to hide field properties. |
7. Perform Steps 5 and 6, above, until all the tabs have all the fields necessary for the
form type.
8. For tree form types,
select the Children tab to define
the parent/child hierarchy. For sequential form types, go to Step 11.
a) The Allowable child type(s) section
identifies which form types can be chosen as a child form. These form types
will establish the tree structure. For example, in the Requirements Group, the
allowable child types are Requirements Group (itself) and requirement. This
means that a Requirements Group can contain other Requirements Groups and
Requirements only.
To allow a similar structure with the form type, select
the Itself checkbox. To add a new
form type, click New Form Type….
This launches another instance of the Create
a new Form Type dialog. Follow the instructions in Steps 3 through 6, above,
to define the new child form type. Save the form type to continue and return.
b) Select Children are edited within this form to
allow child form types to be edited within the parent. The Test Case form type
provides an example of this as the parent form type to the Test Step form type
child form. When selected, child form type information displays on the parent
form type page, and as a separate tab on the parent form type when a user
enters information to create a new item in TRACE.
c) Select Children inherit their parent’s ID to
have child forms display the same ID number as the parent form with an
additional ID number added after the character entered in the Separate child IDs with field. For
example, if the parent form has an ID number of 1.2, and a period (.) is
used as a character to separate child IDs, then the child ID would be 1.2.1, then 1.2.2, and so on.
d) Fill in the Separate child IDs with input. Usually
the separator is . (dot) and is the
dot found in the Form ID like TG 1.1.2
or TS 1.2.3.2
In some cases it may be useful to set the separator set
to - or / or anything else. So the form ids will look like TG 1-1-2.
e) In the Tree Name field, enter a tree name,
which displays as the tab name at the top of the tree level in TRACE.
Figure 6‑5 Tree Name Example
![]()
9. For tree form types,
select the Children tab to define
the parent/child hierarchy. For sequential form types, go to Step 11.
10. For run form types,
select the Results tab to define the
run settings. For sequential form types, go to Step 11.
a) The Track results for section identifies
which form types can be chosen as runnable/executable form. For example, in
Test Run tracks results for Test Case. This means that when a Test Run is
executed it only can execute Test Cases and Test Steps (which are inner
children of Test Cases).
b) Select Allowed Results to provide the possible
results (options) for when a Test Run is selected. Select Force Comment to
force the user to input a comment when provide a specific result. For example a
set of results can be Pass, Fail (with Force Comment checked). When the user
executes a Test Run the only options are Pass or Fail. If chose Fail he must
provide a comment explaining the context.
11. Click Save to save the new or newly edited
form type.