To add fields to an existing form type:
|
Tutorials Available: Go to Creating or Changing a Form Type for an interactive tutorial on adding new form types to a project. |
1.
Log
into the project as a PM.
2.
From
the project home page, click Form Types
from the Action links.
3.
Click
the link for the form type requiring modification. The Edit Form Type dialog displays.
4.
Click
the tab in the middle “form builder” section of the dialog to add fields to it.
a) To add an existing
field, click the field name link in the lower section of the dialog in the Fields list. Once clicked, the field
displays in the selected tab in the middle “form builder” section of the
dialog.
Fields are displayed
in 3 categories:
i. Standard containing all global fields, that can be re-used in any
project but cannot by changed by Project Administrator. Only TRACE Admin can
create and change global fields.
ii. Editable by You containing fields created in the current project and in
the projects where you have Project Administrator rights.
iii. Other containing fields created in other projects that you can
reuse but not change.
|
|
Tip: Use the field search box to
find fields. Search by field name, by field type or by the project name that
created the field. Then use the Details link displayed for each field to
inspect and review the field settings.
|
b) To add a new field,
click the ![]() icon in the lower
section of the dialog.
icon in the lower
section of the dialog.
c) To move a field’s
location, left-click the ![]() icon next to the
field and drag it up or down to a new location.
icon next to the
field and drag it up or down to a new location.
|
|
Tip: To change the name of an
existing field, it is not necessary to create a new field. Add the field to
the form type and then click More to update the field name. |
d) To make a field
required, select the Required
checkbox next to the field.
Figure 6‑6 Field Options
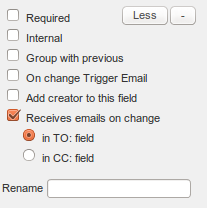
e) To set additional
field properties, click More to the
right of the field. Options include:
● Internal: Select to make this field available to users marked as
Internal.
·
Group with previous: Select to have the field display side-by-side with the
previous field.
·
On change Trigger
Email: Select to trigger an email notification sent to
notifiable users when field value is changed
·
Add creator to this
field: Displays only for user fields. Select to add
automatically the form creator to the field when creating a form of this type.
·
Receives emails on
change (in To or in CC field of the email). Displays only for
user fields. Select to include the users from this field into notifiable user
list (email distribution list) for receiving email notifications when this form
is changed.
·
Rename: Enter a new field name.
|
|
Tip: Click Less to hide field properties. |
5.
Perform
Steps 4 and 5, above, until complete.
6.
Click
Save to save the newly edited form
type.
Refer to Field Type Selections.
Use the Create Field dialog to add new fields
to a project. There are two different methods to use to access this dialog:
● The Fields section of the project home
page. See below.
● The Create a new Form Type dialog. See Modify or Create Form
Types.
To create a new field:
|
|
Tutorials Available: Go to Creating or Changing a Form Type for an interactive tutorial on creating and adding new to a form type. |
1.
Log
into the project as a PM.
2.
From
the project home page, click Fields
from the Action links. If the
project has pre-defined custom fields, they display in this section.
3.
Click
New Field… to display the Create Field dialog.
4.
Enter
information in the following fields:
a)
Name: This is the name
that displays to the left of the field
b)
Description: A description that
displays anywhere the field can be selected in TRACE.
It will also pop up as a tool tip when a user hovers the mouse over the field
name when creating or editing a form.
c)
Type: This drop-down list lets users select the type of
information the field will be used to enter, in addition to what the field will
look like. Depending on the selection, other fields may display directly
beneath this list for additional information. See Field Type Selections for specific information on field type options.
5.
Click
Save. The new field will display in
the Fields section of the Main pane and be available in the Create a new Form Type and/or Edit Form Type dialogs.
1.
Log
into the project as a PM.
2.
From
the project home page, click Fields
from the Action links.
3.
Click
a field link to display the Edit Field
dialog.
4.
Update
information in the following fields:
a)
Name: This is the name
that displays to the left of the field.
b)
Description: A description that
displays anywhere users can select a field in TRACE.
c)
Type: This drop-down list
lets users select the type of information the field will be used to enter, in
addition to what the field will look like. Depending on the selection, other
fields may display directly beneath this list for additional information. See Field Type Selections for specific
information on field type options.
5.
Click
Save.