This section provides
information on selecting field types, including the additional fields that
display when a certain field type is selected.
|
Note: Calculated fields perform numerical
calculations on the form only, and do not work across multiple forms. |
This field type has
two options:
● Formula: A series of functions and arithmetic used
to create a final value.
● Number Format: The format that determines how the
formula’s output will display.
This field type uses
a formula to derive a numerical value. This value is available after the form
is saved. The formula is a combination of arithmetic, functions and numerical
values. For example, to create a Total
field, a simple formula might be:
The term “Number”,
above, is a representation for the value (of the field data) that the
calculated field will apply the formula to. Calculated field types use the
field name to represent the value entered in the field. The actual formula
might look something like this:
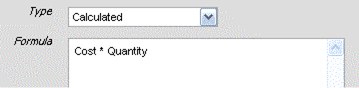
In this example, the
value in the Cost field represents
the unit cost. This value multiplied by the value in the Quantity field creates the value in the Total field. The actual text that a user would enter in the Formula text box for the Total field would be:
Figure 6‑7
Formula Text Field Example
Note that the Cost and Quantity fields must be on the same form as the Total field for the calculation to work
properly. The following figure provides a pictorial representation of the
actual fields in TRACE when added to a form:
Figure 6‑8 Example Fields on Form
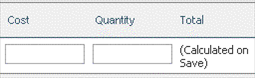
In this example, the Total field is a calculated field that
displays the results of the formula once the form is saved. While this example
focused on using multiplication, calculated fields also allow addition,
subtraction, and division, as well as functions.
|
Note: Do not use arithmetic symbols such as -, +, /, or * in field names. For
example, a field titled Cost Type
is acceptable, whereas Cost-Type
would cause calculations to fail, as the formula would read Cost field MINUS Type field. |
Functions provide
additional features above and beyond that of simple arithmetic. For example, to
apply the Cost and Quantity values in the previous
examples to different products with different pricing using simple arithmetic,
the user would have to enter the product type and numerical (pricing) values
manually in separate fields. Using this approach requires the user to know
which values to enter. Depending on the complexity of the products and pricing,
this approach may increase the possibility of user-input error. A better
solution is to use the SWITCH
function to automate the process.
The SWITCH function provides the ability to
associate a text description with a numerical value, and then “switch” the
value, depending on the selection. The selected value is then added to the rest
of the formula to derive the total. For example:
SWITCH(Product Type,
'Basic',100,'Standard',200,'Deluxe',300,0) * Quantity
The form might look
something like this:
Figure 6‑9 Form Example with Selection List
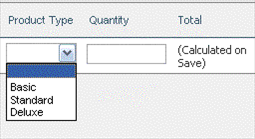
In the example above, Product Type represents the field name for a Choice field type. Basic, Standard, and Deluxe
represent the selection list choices, and 100,
200, and 300 represent the values that are “switched” depending on the
selection. The 0 (zero) at the end
of the formula represents the Default
Return value if no selection is made. In this example, if a user selects Standard, the value used in the
formula’s calculations is 200.
Another refinement is to use the SWITCH function twice: once to set the Product Type cost, and another time to set a fixed discount that
varies with the Product Type
selection. For example:
SWITCH(Product Type,
'Basic',100,'Standard',200,'Deluxe',300,0) * Quantity * SWITCH(Product Type,
'Basic',.95,'Standard',.9, 'Deluxe',.85,0)
In this example, a discount of 5, 10, or 15 percent
applies automatically to the total, while no additional fields were added to
the form. To simplify, the formula performs the following math:
Product Type Cost *
Quantity * Product Type Discount
Another variation is to use a discount selection list to
alter the discount level by customer type:
SWITCH(Product Type,
'Basic',100,'Standard',200,'Deluxe',300,0) * Quantity * SWITCH(Discount by
Customer, 'New',.9,'Silver',.85, 'Gold',.8,1)
Note that the numerical value at the end of the formula
is a 1 (one) instead of a 0 (zero). This change ensures the math
stays correct if the user does not choose a discount to apply. To simplify, the
formula performs the following math:
Product Type Cost *
Quantity * Discount by Customer
The form might look
something like this:
Figure 6‑10 Form Example with Two Selection Lists
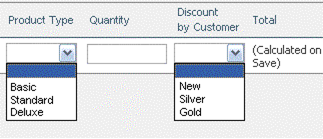
Some guidelines for
using functions:
● The function name is
all capital letters, for example: SWITCH
or CONCAT
● Parentheses
immediately follow the function name with no spaces, for example: SWITCH (Field Name, ‘Selection1’….
● Brackets contain
calculations within calculations. See the list of functions below for examples.
● Combine functions as
necessary, but ensure that the math is correct.
● The terms Number and String in the functions list below refer to the value and/or type
of the field data. Number refers to
numerical references only, whereas String
may refer to text and/or numbers combined. Substitute the field name for the
words Number and/or String.
● The function must
support the field type. For example, to perform numerical calculations, all
fields involved must have numerical data or use the SWITCH function to substitute text strings for numbers. Trying to
perform calculations on text will return an error when the form is saved.
· MIN(Number [, Number [, ... ]]): Returns the smallest of the arguments.
· MAX(Number [, Number [, ... ]]): Returns the greatest of the arguments.
·
CONCAT(Separator, String
[, String [, ... ]]): Returns the string arguments put together with Separator
in between each. Use to place a string of items together from different fields.
·
AVG(Number [, Number [,
...]]): Returns the average for the arguments.
·
QTR(Date [, FirstMonth =
2]): Returns the quarter (FYXX QY) for the given date. Use FirstMonth to control which month the
fiscal year starts on.
·
IF(Bool, WhenTrue,
WhenFalse): Returns WhenTrue
if Bool is true, or WhenFalse otherwise. Bool can be a Flag field type or a
boolean expression with ==, !=, <, >, <=, >=, &&, ||.
·
SWITCH(Value, CompareTo,
Return [, CompareTo, Return [, ...]] [, DefaultReturn]): Compares Value
to each CompareTo and returns the
corresponding Return, finally
returning DefaultReturn if provided
and nothing matched. See Using Functions,
above, for additional information.
·
RIGHT(String,
NumberOfChars): Returns the rightmost NumberOfChars from String.
For example, if the String contained the text “Wind River” and NumberofChars is
set to “5”, the returned value would be “River”.
·
LEFT(String,
NumberOfChars): Returns the leftmost NumberOfChars
from String. For example, if the
String contained the text “Wind River” and NumberofChars is set to “4”, the
returned value would be “Wind”.
·
MID(String,StartChar,NumberOfChars):
Returns the characters of String from StartChar + NumberOfChars. For example, if the
String contained the text “Wind River”, StartChar is set to the letter “i” and
NumberofChars is set to “7”, the returned value would be “ind Riv”.
·
DATE(Day, Month, Year):
Creates a valid date value from Numbers, Day, Month (1-12), and Year (4-digit).
· DAY(Date): Returns the number value corresponding to the day of month from Date.
· MONTH(Date): Returns the number value corresponding to the month from Date.
· YEAR(Date): Returns the number value corresponding to the year from Date.
Use the Number Format
field to set how the calculation displays once the form is saved. Table 6‑1 provides a list of available format options.
Table 6‑1 Number Format Options
|
Symbol |
Example |
Description |
|
0 |
000 |
Digit or numerical placeholder. If the
calculation result is less than the number of zeros, placeholder zeroes
display. For example: 100, 010,
001. |
|
# |
### |
Digit or numerical placeholder that
does not display zeroes as placeholders. For example, 100, 10, 1. |
|
. |
###.00 |
Decimal separator or monetary decimal
separator. To use as a monetary decimal separator, ensure that zeroes follow
the decimal point to keep placeholders for cents values. For example: 123.456 or 123.45. |
|
, |
###,###.00 |
Numerical group separator. Use to
display commas for thousands, hundred thousands, and so on. Mix with the
decimal separator to provide a combination of comma and decimal separation.
For example, 123,456,789 or 123,456.78. |
|
$ |
$###,###,###.00 |
Prefix to denote US dollars. For
example, $123,456,789.10. |
|
' |
'WRS'### |
A prefix used to quote special
characters. For example: WRS123. |
|
E |
Placeholder to separate the mantissa
from the exponent in scientific notation. For example: 1.234E3. |
The Choice field type
creates selection lists for use in any form. Additional fields include:
● Allow Multiple Selections: A Choice field type
displays a drop-down list box by default. Select Allow Multiple Selections to create a combo box with an add dialog
pop-up to allow the selection of multiple items.
● Allow new Entries: Select to add an entry titled Other… to the selection list. When a user clicks Other…, a text box displays for adding
a new entry.
● Keep sorted: Select to keep list
items sorted alphabetically and numerically.
● Choices: Use Add and Delete to manage list choices. Entries
here display as field choices.
● Export/Import: Choice values can be
exported in CSV format.
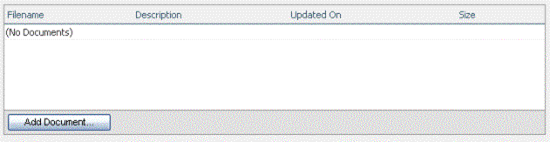
Document field types
are text fields with an Add Document
button for launching a dialog to add documents or web links to documents to the
field. Select Allow Multiple Selections
to provide the functionality of adding multiple documents to the field.
Figure 6‑11 Document Field with Multiple Selections
A Flag field type creates a checkbox for the user. This
field returns a 1 (one) when selected or a 0 (zero) when not selected.
Number field types are used to enter numerical data only.
Additional fields include:
● Format: See Table 6-1, Number Format Options.
● Minimum: Enter a minimum
number, or leave blank for no numerical lower limit.
● Maximum: Enter a maximum
number, or leave blank for no numerical upper limit.
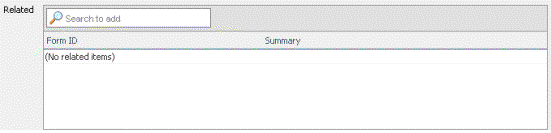
This field type provides a way for users to create links
to other TRACE forms. Related field types display a Search to add field for locating forms that a user wants to
establish a relationship to.
Figure 6‑12 Related Field
The Related Type selection list provides a
way to determine the manner in which related items associate with other related
items. Choices include:
● Straight: The default selection. A straight relationship creates
links between two forms, for example, Form A and Form B. When a user opens Form
A, a link to Form B displays in Related section of the page. When the same user
open Form B, a link to Form A displays. When a user performs a search, all
forms that contain the search criteria display in the results for possible
addition to the Related field. Note that the search will only return new
related items.
● Inverse: An inverse relationship is used to create specific
dependencies between form types, and also to establish the direction of the relationship.
Direction in this instance refers to the linking between two inverse fields,
and is independent of the forms the fields are located on. When a user creates
a new form type, and selects an inverse Related field type, they must choose
the direction of the relationship. For example, Form A belongs to a Test module
and Form B belongs to a Requirements module. Since tests and requirements are
inter-related as part of project management, the user wants to create a
relationship between a test item and the requirement that defines it. The test
item will only refer to the requirement and vice versa. Other project items
such as bugs, issues, and so on will not be included as part of the
relationship. Using this example, the user creates an inverse relationship
first from Form A to Form B, establishing that the direction is from Form A to
Form B. Next, the user creates an inverse relationship from Form B to Form A,
establishing the direction is from Form B to Form A. When these form types are
put to use, project staff will only be able to search for and add related items
with the inverse direction, or more specifically, forms that have been created
to link to the form they are working in.
● Double Inverse: A double-inverse relationship establishes a two-way
connection between two forms. One example in TRACE is the blocks/depends on
feature. For example, if issue I0001 keeps action item A0005 from being
completed, I0001 blocks A0005. Consequently, A0005 depends on the resolution of
I0001 for its own successful completion. Where an Inverse relationship only
allows related fields to link in a single direction, the double inverse
establishes a two-way relationship between two forms. When a user performs a
search, all forms that contain the search criteria display in the results for
possible addition to the Related field, like a straight relationship.
Text field types
provide entry for any text string, including numerical characters. Select Multi-line to provide a wrapped
multi-lined text box.
Long Text
Text field types provide
entry for any text string up to 8,000 characters.
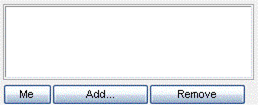
User field types are
text fields with buttons for adding or removing TRACE project staff to/from the
field. Select Allow Multiple Selections
to provide the functionality of adding multiple users to the field.
Figure 6‑13 User Field with
Multiple Selections